[ERROR] PASS failed!
|
Phone Camera
|
Pic-a-day 12/21/2014  | Pic-a-day 12/20/2014  | Pic-a-day 12/19/2014 day 3  | Pic-a-day 12/18/2014 - day 2 sourdough starter 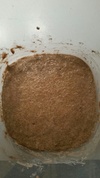 | Pic-a-day 12/12/2014 first pour of snot  | Pic-a-day 12/08/2014  | Pic-a-day 12/6/2014 nailed it  | Pic-a-day 12/1/2014 back in business  | Pic-a-day 11/29/2014  | Pic-a-day 11/25/2014  |
|
|
BizB
|
|
|
Redoing the surround.
2007-04-06 |
Alright, I'm going to milk this project for at least 2 updates. It all started a long time ago when the caulk around the bathtub/shower-surround began to break down. Unfortunately, I didn't take care of it in time. This allowed the water to wick up the back of the surround walls and dampen the plaster board behind. Of course, I didn't know all that was happening. All I knew was that the caulk was in need of attention and that there were small bits of plaster behind the surround that had fallen from the wall and they were now resting at the base of the surround, pushing out the bottom edge. Before I caulked it again, I wanted to get those bits and pieces out of there.
The answer, unfortunately, was to take down the surround. When I did, what I found was not pretty. I took the first picture after I had ripped down all the damp plaster board.
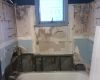 All the plaster was resting in the bottom of the tub. It was heavy and smelled horrible. When I carried the bag to the curb, I was afraid that it was too heavy for the garbage men to take. Fortunately, they did take it. It probably seemed like no big deal after they'd been next door. The college kids just had someone move out and they had 1/2 of the front lawn filled with trash.
 I knew there was no way I'd finish this before I needed a shower again, so I decided to see if I could rig something to protect the walls so that I could shower. Luckily, I had some black 6mm plastic that I hung with duct tape. I also went to Wal-Mart and got a shower rod (which I'll probably return) and a shower curtain.
 I forgot to get curtain rings, so I improvised with some zip-ties.
 The duct tape appeared to hold really well.
 I got lucky with the length. It was a bit longer than I wanted, but it still allowed me to stand in the tub without standing on the black-plastic.

I went to BigBro and Froggie's house to pick up some tools. The place is coming together nicely!


Thanks for the tools, bro! They sure made my job easier. I used the angle grinder to trim back the old plaster board. I used the nail-gun to attach some 2X4s (Thanks sopops, that was a great idea.)
 Some simple cutting and the first replacement piece is in place, temporarrily.
 I couldn't get enough 2X4s in the front of the tub because of the plumbing, so I decided to nail in some 1/4 inch plywood that I had laying around. It was a challenging cut, but I made it fit. I left that area above the plywood open. I don't think that will matter. I hope not.
 Some more cutting - a bit fancier this time - and the second piece is in place.
 Now, some seriously fancy cutting, all done with a razor knife, and the last piece of plasterboard is in place. Again, I left the hole. It will haunt me, I'm sure.
 Some screws and viola! I'm ready to... something. What is the next step?
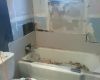 Oh, sure! Now I remember! I had to go to the store and get some spackeling to make the joints all pretty. Well... as pretty as I can. Here's the first attempt. I'm sure there will be more plaster and some sanding before it looks right.
 Next, I removed all of the old glue from the places where the surround pieces would overlap. This wasn't even a little bit fun.
 Then, I put down some caulk remover. 2 hours later, I scraped it up.
 I was going to put the surround walls in place tonight, until I read the destructions on the back. It says that I have to wait 24 hours after I glue it up to use the shower. So, the black plastic and the shower curtain go back up. This time, I hung the plastic a bit higher.

|
|
|
|
 BizB Mon Apr 09 07:31:21 PM
  The bumper sticker says...
 BigBro Mon Apr 09 09:53:37 AM
  Betty Boop Mon Apr 09 08:40:11 AM
 sopops Sun Apr 08 07:15:06 PM
